Customizing your profile
You can customize your profile so that other people can get a better sense of who you are and the work you do.
About your profile
Your profile page tells people the story of your work through the repositories you're interested in, the contributions you've made, and the conversations you've had.
You can add personal information about yourself in your bio, like previous places you've worked, projects you've contributed to, or interests you have that other people may like to know about. For more information, see "Adding a bio to your profile."
If you add a README file to the root of a public repository with the same name as your username, that README will automatically appear on your profile page. You can edit your profile README with GitHub Flavored Markdown to create a personalized section on your profile. For more information, see "Managing your profile README."

People who visit your profile see a timeline of your contribution activity, like issues and pull requests you've opened, commits you've made, and pull requests you've reviewed. You can choose to display only public contributions or to also include private, anonymized contributions.
People who visit your profile can also see the following information.
- Repositories and gists you own or contribute to. You can showcase your best work by pinning repositories and gists to your profile.Pine items to your profile.
- Repositories you've starred.
- An overview of your activity in organizations, repositories, and teams you're most active in. Show an overview of your activity on your profile.
- Badges that show if you use GitHub Pro or participate in programs like the Arctic Code Vault, GitHub Sponsors, or the GitHub Developer Program. For more information, see
You can also set a status on your profile to provide information about your availability
Personalizing your profile
You can share information about yourself with other GitHub users by setting a profile picture and adding a bio to your profile.
- Changing your profile picture
Your profile picture helps identify you across GitHub in pull requests, comments, contributions pages, and graphs.
When you sign up for an account, GitHub provides you with a randomly generated "identicon". Your identicon generates from a hash of your user ID, so there's no way to control its color or pattern. You can replace your identicon with an image that represents you.
Tip: Your profile picture should be a PNG, JPG, or GIF file under 1 MB in size. For the best quality rendering, we recommend keeping the image at about 500 by 500 pixels.
Setting a profile picture
In the upper-right corner of any page, click your profile photo, then click Settings.
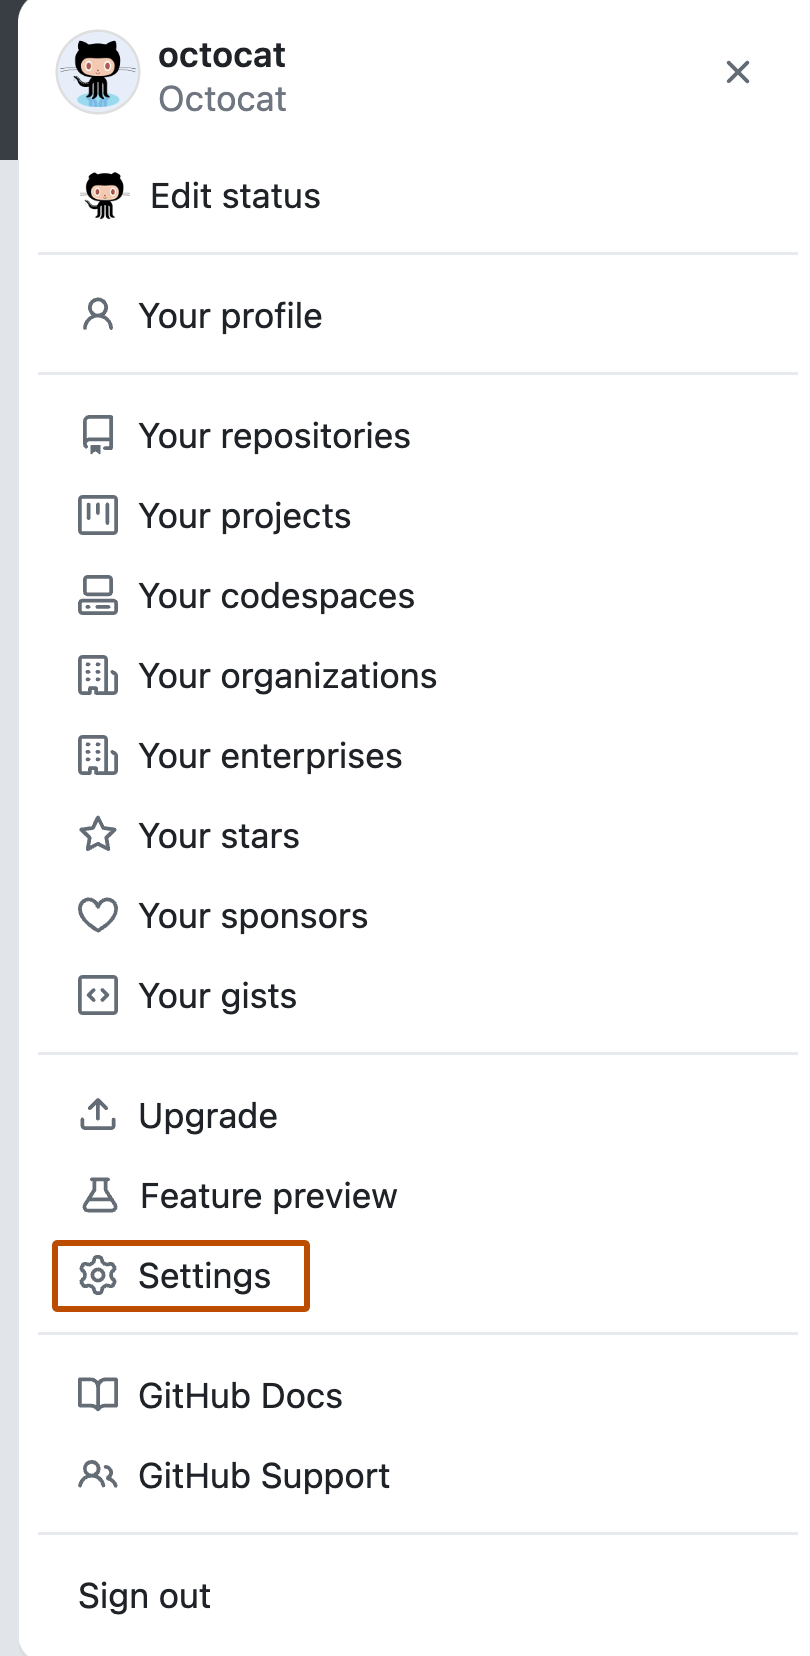
Under Profile Picture, click Edit.

Click Upload a photo....

Crop your picture. When you're done, click Set new profile picture.
![]()
Setting a status
You can set a status to display information about your current availability on GitHub. Your status will show:
- on your GitHub profile page.
- when people hover over your username or avatar on GitHub.
- on a team page for a team where you're a team member.
- on the organization dashboard in an organization where you're a member.
Pinning items to your profile
You can pin gists and repositories to your profile so other people can quickly see your best work.
You can pin a public repository if you own the repository or you've made contributions to the repository. Commits to forks don't count as contributions, so you can't pin a fork that you don't own. For more information, see "Why are my contributions not showing up on my profile?"
You can pin any public gist you own.
Pinned items include important information about the item, like the number of stars a repository has received or the first few lines of a gist. Once you pin items to your profile, the "Pinned" section replaces the "Popular repositories" section on your profile.
You can reorder the items in the "Pinned" section. In the upper-right corner of a pin, click and drag the pin to a new location.
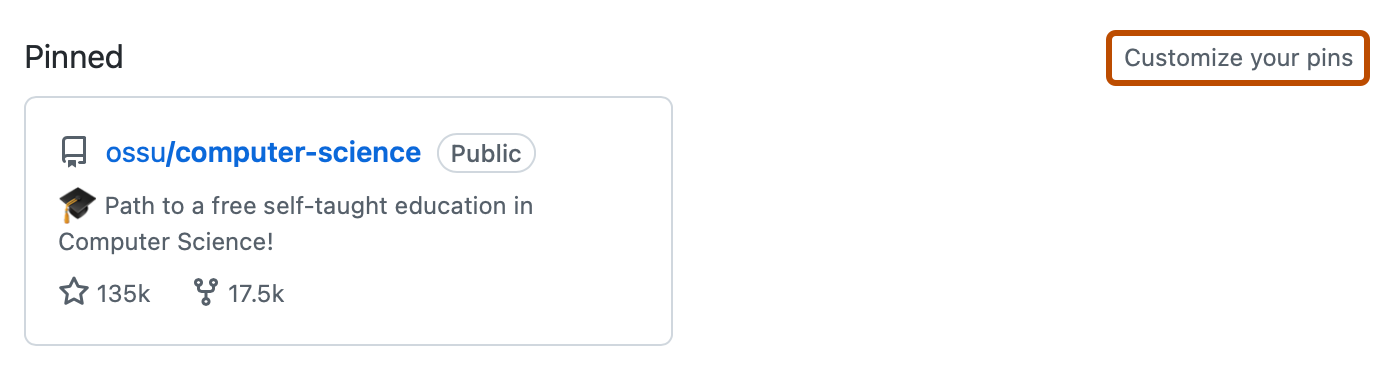
1.In the top right corner of GitHub, click your profile photo, then click Your profile
![]()
2.In the "Popular repositories" or "Pinned" section, click Customize your pins.
3.To display a searchable list of items to pin, select "Repositories", "Gists", or both.

4.Optionally, to make it easier to find a specific item, in the filter field, type the name of a user, organization, repository, or gist.

5.Select a combination of up to six repositories and/or gists to display.

6.Click Save pins.
About your organization's profile
Your organization's profile page shows basic information about your organization.
You can optionally choose to add a description, location, website, and email address for your organization, and pin important repositories. You can customize your organization's profile by adding a README.md file. For more information, see "Customizing your organization's profile."
To confirm your organization's identity and display a "Verified" badge on your organization profile page, you must verify your organization's domains with GitHub. For more information, see "Verifying or approving a domain for your organization."

Managing your profile README
You can add a README to your GitHub profile to tell other people about yourself.
About your profile README
You can share information about yourself with the community on GitHub by creating a profile README. GitHub shows your profile README at the top of your profile page.
You decide what information to include in your profile README, so you have full control over how you present yourself on GitHub. Here are some examples of information that visitors may find interesting, fun, or useful in your profile README.
- An "About me" section that describes your work and interests
- Contributions you're proud of, and context about those contributions
- Guidance for getting help in communities where you're involved
You can format text and include emoji, images, and GIFs in your profile README by using GitHub Flavored Markdown
Prerequisites
GitHub will display your profile README on your profile page if all of the following are true.
- You've created a repository with a name that matches your GitHub username.
- The repository is public.
- The repository contains a file named README.md in its root.
- The README.md file contains any content.
Note: If you created a public repository with the same name as your username before July 2020, GitHub won't automatically show the repository's README on your profile. You can manually share the repository's README to your profile by going to the repository on GitHub.com and clicking Share to profile.

Adding a profile README
1.In the upper-right corner of any page, use the drop-down menu, and select New repository.
2.Under "Repository name", type a repository name that matches your GitHub username. For example, if your username is "octocat", the repository name must be "octocat".
3.Optionally, add a description of your repository. For example, "My personal repository."
4.Select Public.
5.Select Initialize this repository with a README.
6.Click Create repository.
7.Above the right sidebar, click Edit README.
The generated README file is pre-populated with a template to give you some inspiration for your profile README.

For a summary of all the available emojis and their codes, see "Emoji cheat sheet."
Displaying badges on your profile
