SuiteCRM
![]()
What is SuiteCRM?
SuiteCRM is a software fork of the popular Customer Relationship Management (CRM) system SugarCRM, developed and maintained by SalesAgility. It is a free and open source alternative application. It was released on October 21, 2013 as version 7.0. The latest production version at the time of publishing this User Guide is SuiteCRM 7.6.3. The story of SuiteCRM starts with SugarCRM. SugarCRM was founded in 2004 and consisted of an open source version (called Community Edition) and various paid versions. However trouble started brewing when it appeared that SugarCRM would not be releasing a Community Edition of SugarCRM 7 and would be providing limited, if any, updates to the Community Edition. SalesAgility forked SugarCRM Community Edition to create SuiteCRM and added various open source plugins for improved functionality. You can download and host SuiteCRM on your own servers, you can put it in a public cloud, a private cloud or you can access it as software-as-a-service. It is the ultimate freedom, allowing you to stay in full control over your business data.
Setting up SuiteCRM
Downloading and Installing
- SuiteCRM installer Download
- In the Administration guide you will find Installation instructions
GitHub
SuiteCRM is also available on GitHub at github.com/salesagility/SuiteCRM
Getting started
To check out the guide, visit docs.nestjs.com.
Forking SuiteCRM
- Fork the SuiteCRM repository
- Setup Git on your local machine
- Clone your repository on your local machine
- With git setup and your GitHub fork created, we can now clone the git repository to our local machine. Change to the directory you wish to do this at, and issue this command to clone the SuiteCRM repository ( changing username for your username in GitHub )
git clone git@github.com:username/SuiteCRM.git
- Now that we have cloned the repository locally, we next need to setup the remote repositories that this repository will reference. By default, git creates the origin remote, which points to the fork you created on github (https://github.com/username/SuiteCRM) . However, in order to stay up to date with the changes to the parent repository (https://github.com/salesagility/SuiteCRM) you’ll want to setup the upstream remote as well. Here’s how:
cd SuiteCRM
git remote add upstream git://github.com/salesagility/SuiteCRM
git fetch upstream
- Now anytime you want to update your forked branch it’s a simple process. Just change to the branch you want to update from the upstream (for example, the master branch) and then issue the commands below:
git checkout master
git fetch upstream
git merge upstream/master
git push origin master
- These commands will pull down the latest changes from the upstream repo (https://github.com/salesagility/SuiteCRM) to your local repo, then merge the changes into your local clone’s master branch, and finally push those changes back up to your fork’s repository on Github. This is key to keep your master, hotfix, and develop up to date after a minor and major release.
- You can also Test Pull Requests: Check out awaiting pull requests on our SuiteCRM repo here. Select a pull request that is ready to test.
Start a SuiteCRM website
To help you get started with SuiteCRM our Technical Support team provides Free SuiteCRM Installation.
- Free SuiteCRM Installation by our Support Team
- Free Domain Name for Life
- 24/7 Technical Support team
- Optimized SSD SuiteCRM Hosting
- Fast and Secure Servers
Manually Install SuiteCRM
The manual SuiteCRM installation includes the following steps:
- Step 1: Download and Prepare SuiteCRM Files
- Step 2: Initiate SuiteCRM Installation
- Step 3: SuiteCRM Successfully Installed
Step 1 Download and Prepare SuiteCRM Files
The first step is to download the latest stable release of the application. You can do that via the official SuiteCRM website. Once you get the download package, extract the files on your local computer. This will create a folder that contains all of the installation files you need. The next step is to upload those files to the server and the exact location, where you would like to install SuiteCRM. If you wish to install the application directly on the primary domain of your account, you will have to upload the SuiteCRM files in the public_html/ directory of your account. However, if you wish to install SuiteCRM in a subfolder or subdomain, this location will be different. There are two ways of uploading your files to the server - using an FTP client, or uploading directly through your cPanel account > File Manager.
Step 2 Initiate SuiteCRM Installation
Up until this moment, you will have a location on your account, where you have the SuiteCRM installation files ready. It is time to proceed with the actual installation. Simply access the location of your SuiteCRM installation, followed by /install.php. This will initiate the installation script. The first step will request that you choose the language for the installation process of SuiteCRM. Select the language of your choice and click on the Next button to proceed. You need to select the MySQL type for the new installation. Click Next to proceed. The next step is the Database Configuration. You will need to prepare a clean database and a user assigned to it with full privileges for your new installation.
MySQL Configuration
You can create a new database and a user assigned to it via cPanel.The MySQL Database Wizard is another useful tool that allows you to create a MySQL database and user via a web interface. If you are about to install a PHP-MySQL application and you do not have a database already created for your script, this tool will guide you through all the steps needed to create such. To access the MySQL database Wizard, please scroll to the Databases section in your cPanel and click on the MySQL Database Wizard icon. During the first step of your new database creation you will need to input the desired database name. Be advised that all cPanel databases are created with a prefix. This prefix represent your cPanel username and assures that your database name will be unique on the shared hosting environment even if you use a general database name such as test. Then give username password and Create User. During the next step you should add privileges to your database user. When you are ready, click on the Next Step button on the bottom of the page. This will complete the process and you can now use your database name, user and password to install your application.
Once you get your database ready, you will have to edit the following options:
- Database Hostname: Enter “localhost” without the quotes, if your database is hosted on the same server.
- Database Name: Enter the newly created database for your website.
- Database User: Enter the user assigned to your database.
- Database Password: Enter the password.
The next step is the Site Configuration. The last step is a review of all details you have specified for the new installation. Simply review them and make sure that it is configured the way you need. Once you are ready, click on the Install button to initiate the process. You can also choose if you wish to import demo content on your website. If you are new to SuiteCRM, this will be a useful feature for your website that will allow you to test it’s features.
Step 3 SuiteCRM Successfully Installed
The system will complete the actual installation automatically for you. Upon completion, you will receive a successful message. Click on the Next button and you will get redirected to your new website. Enjoy!
SuiteCRM Configuration
- To access the file, you need to locate the SuiteCRM installation folder on your account. If you are accessing your website directly via the primary domain of your account, this indicates that SuiteCRM is installed in the public_html/ directory of your account. However, this may differ if your website is configured on subfolder or subdomain. Once you access the location of your SuiteCRM website, you need to look for a config.php file. It contains a lot of information, such as the database details of your website, the domain used on your website and much more. The database details are being held in the following section in the file:
 'dbconfig' =>
  array (
    'db_host_name' => 'localhost',
    'db_host_instance' => 'SQLEXPRESS',
    'db_user_name' => 'suitecrm_scrm',
    'db_password' => 'p4ssw0rd',
    'db_name' => 'suitecrm_scrm',
    'db_type' => 'mysql',
    'db_port' => '',
    'db_manager' => 'MysqliManager',
  ),
You can also see the domain set on your website, the version and much more:
  'site_url' => 'http://suitecrm.fcomet.com',
  'slow_query_time_msec' => '100',
  'sugar_version' => '6.5.20',
  'sugarbeet' => false,
  'suitecrm_version' => '7.2.1',
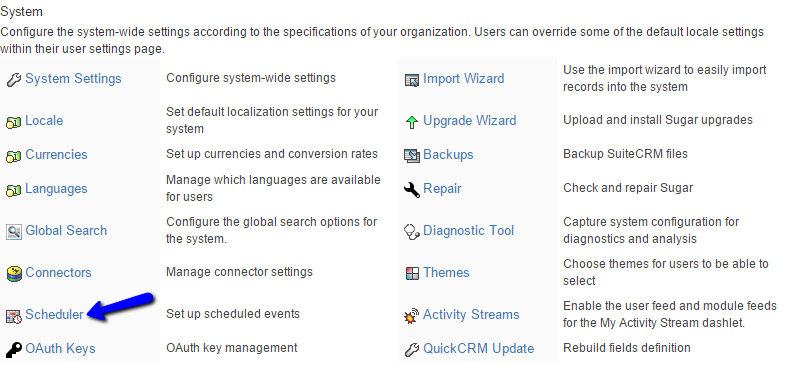
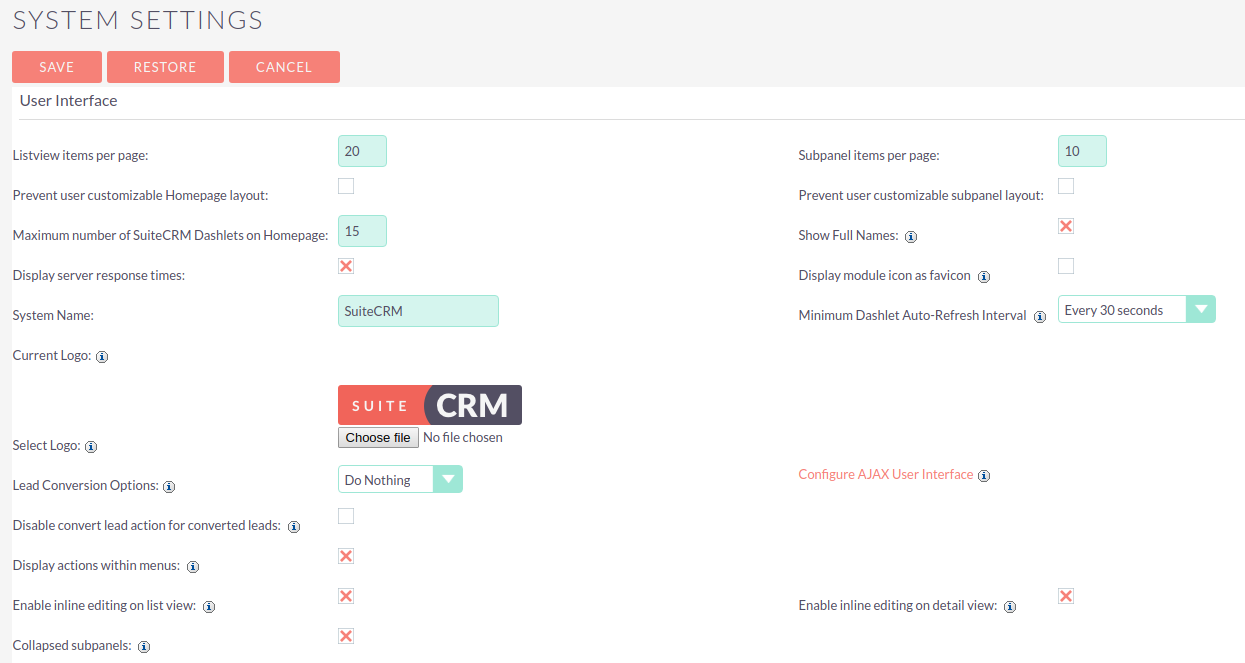
- You first need to log into your website as administrator. Click on the Administrator button at the top-right corner of the screen and then the Admin option. In the System tab, click on the System Settings option to proceed with the configuration. There are a few sections with different configuration options for your SuiteCRM. They are:
- User Interface - You can specify the look and feel of the basic SuiteCRM features. You can set a name for your website and upload a logo as well
- Proxy Settings - You can configure a proxy service for your website
- SkypeOut - You can enable a SkypeOut integration on your SuiteCRM website
- Advanced - Advanced configuration options for your website. In most cases, those options will enable different statistics for your website, but they will also slow it down
- Logger Settings - Configure logging of system messages on your website When ready, simply click on the Save button at the top to keep the changes.
Manage Currencies in SuiteCRM
You need to log into the administrative area of your website first. Locate the System section and select the Currencies service. The system will display the available currencies on your website. If you have never added any additional currencies, you will see the default one only, which is US Dollars. To add a new currency, you will notice a section called Create just below the list. Enter the following details for the new currency:
- Currency Name - Enter the name of the new currency that you will be adding
- Conversion Rate - Enter the conversion rate, compared to the default US Dollars currency
- Status - Set the status of the new currency. Select Active to enable it
- ISO 4217 Code - Enter the three-letter code for the new currency
- Currency Symbol - Enter the default symbol for the new currency To remove an existing currency from your website, you can simply click on the Delete button next to it. Note that you cannot remove the default US Dollars currency.
Manage Sheduled Jobs in SuiteCRM
In SuiteCRM you have the ability to set automatic tasks that will be executed by the system on specified interval. This is a good feature that ensures that the most important procedures are handled automatically to avoid human errors. First, you need to access the administrative area of your SuiteCRM installation. In the System section, select the Scheduler option. You will see a list of all available scheduled jobs on your website. Some of them are activated by default, some of them not. To create a new job, you need to click on the Create button at the top-right corner of the screen. Edit the following options:
- Job Name - Enter the name of the new job
- Job - Select the Job to be executed
- Interval - Specify the interval, when the job should be executed by the system
- Status - Enable or disable the new job
- Job URL - Set a job URL (optional) You can also edit the existing jobs on your website simply by clicking on it’s name. This will take you to the Job configuration page, where you can change it per your needs. To remove a job, simply select it and then click on the Delete button just about the list.
Repair Tool in SuiteCRM
SuiteCRM comes with a built-in repair tool that you can use. It provides a large number of useful features to save you time and efforts. To access the repair tool, you will need to access the administrative area of your SuiteCRM website first. Locate the Settings section on the page and then Repair. You will be presented with a list of different tools that you can use on your website. Some of the most important tools are the ability to repair your database, rebuild .htaccess, configuration file and many other files on your website. You can also repair roles, activities, remove missed files from the upload directory and many more. Click on a tool that you wish to use to execute it instantly.
SuiteCRM Workflows Explained
SuiteCRM Workflows are powerful, but some of the available options can be confusing for new users. I’ll try and breakdown some of the elements that determine when and how a workflow runs.When does it run? Requirements for each kind of Workflow to be triggered. To clarify and facilitate troubleshooting, I’ve laid out every possible combination of the option that affect when Workflows are triggered. Then I can explain each one.

All of the mentioned conditions must be met in order for the Workflow to be successfully triggered.An additional condition that applies to all Workflows is that they only run if their Status is set to Active.
Administration SuiteCRM
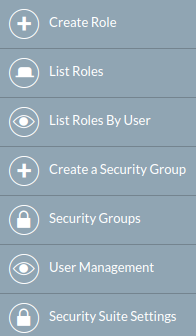
- User Management
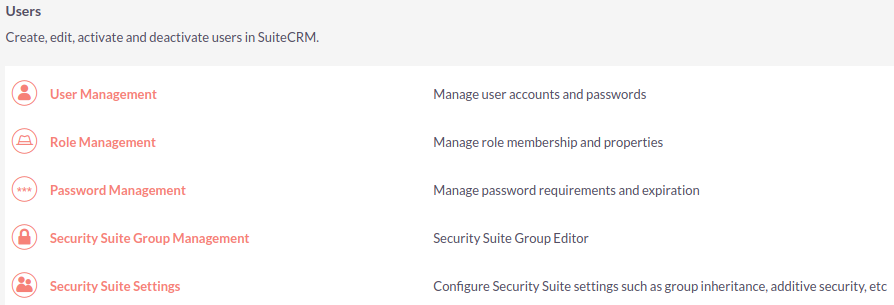
- Role Management
- System Settings
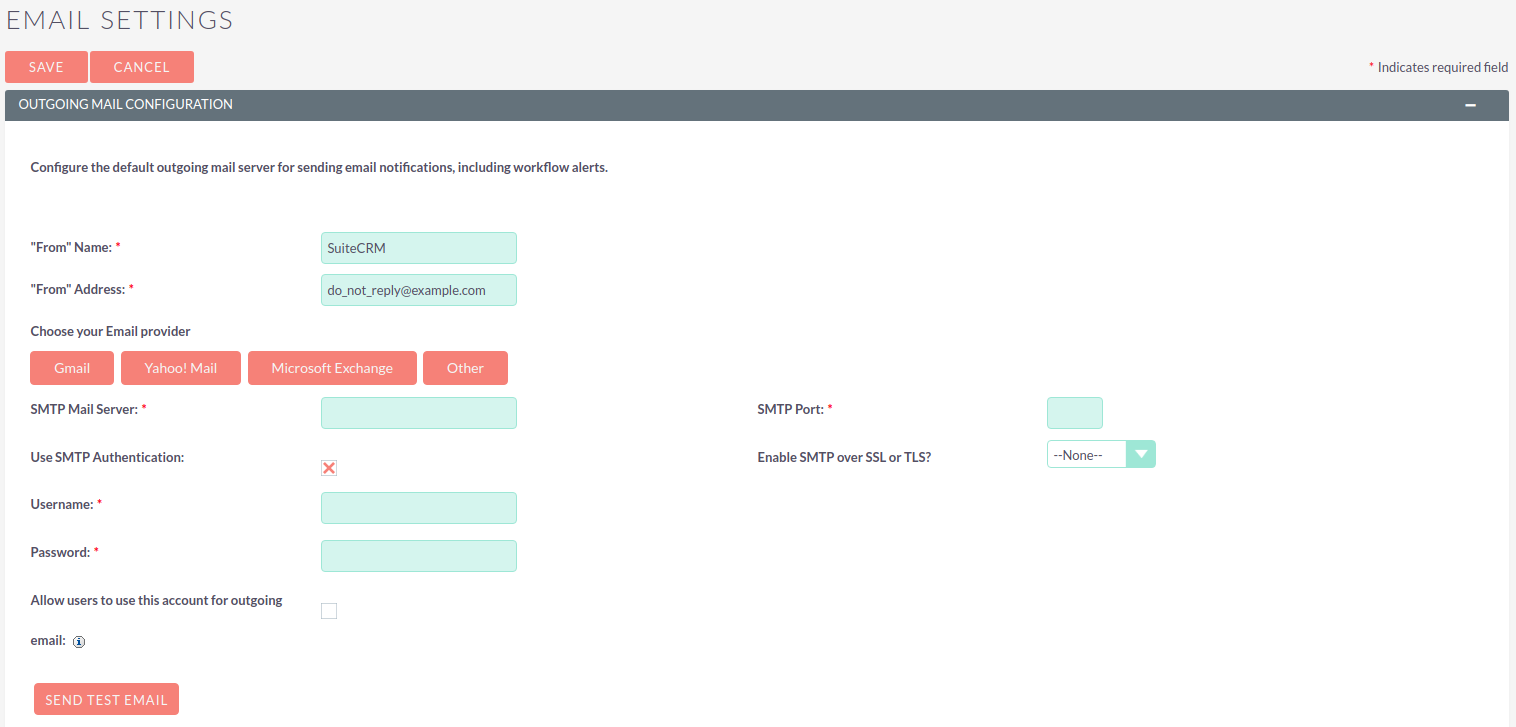
- Email Settings
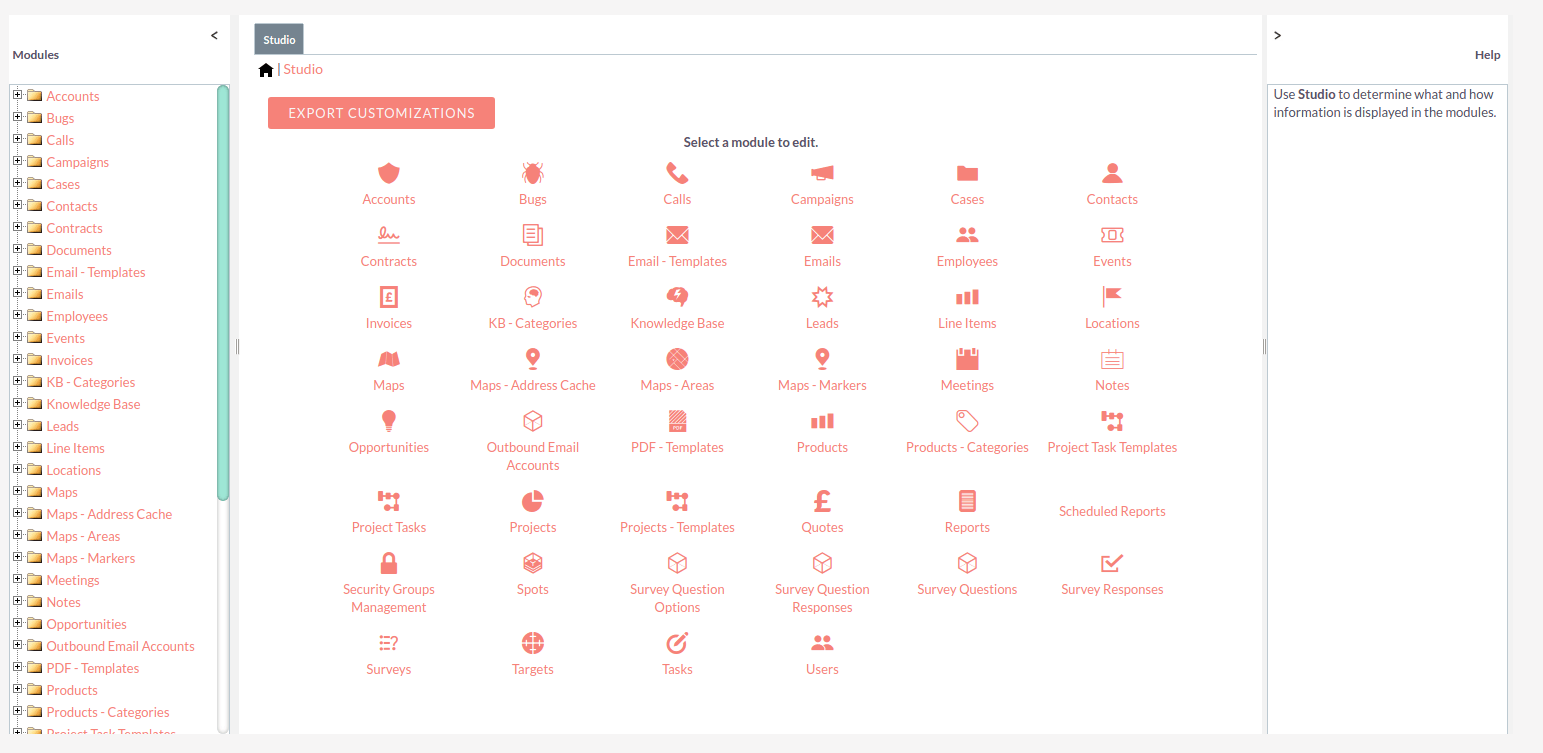
- Studio
SuiteCRM Data Integration
SuiteCRM Data Integration is an Extract, Transform and Load (ETL) solution that connects to an existing SuiteCRM installation to extract source data from the MySQL database and load that into the Data Warehouse, that has been optimised for analytical functions. SuiteCRM Data Integration can be installed as a stand-alone solution and can be used with other reporting tools if desired. SuiteCRM Data Integration requires the following pre-requisites installed on your server
- Linux environment
- OpenJDK 8 JRE (Java)
- wget
- unzip
- zip
- Mysql server + an empty MySQL database
Clone the SuiteCRM Data Integration repo:
git clone https://github.com/ivylabs/suitecrm-data-integration
./build.sh
Would you like to remove the installation files? This will save disk space. [y/N] y

-------------------------------------------------------------

 Build is complete!

-------------------------------------------------------------
# Java Virtual Memory allocation
JVM_SIZE=1024
# SuiteCRM Source Database Connection Details
SUITECRM_HOST=127.0.0.1
SUITECRM_PORT=3306
SUITECRM_DATABASE=suitecrm_testdata
SUITECRM_USERNAME=suitecrmrootuser
SUITECRM_PASSWORD=suitecrmrootuserpassword
# SuiteCRM Analytis Target Database Connection
SUITECRM_ANALYTICS_HOST=127.0.0.1
SUITECRM_ANALYTICS_PORT=3306
SUITECRM_ANALYTICS_DATABASE=suitecrm_dwh
SUITECRM_ANALYTICS_USERNAME=suitecrmrootuser
SUITECRM_ANALYTICS_PASSWORD=suitecrmrootuserpassword
# Enable SMTP email functionality
SMTP_ENABLED=0
# SMTP Server Details
SMTP_HOSTNAME=smtp.gmail.com
SMTP_PORT=587
SMTP_USE_AUTHENTICATION=1
SMTP_USERNAME=user@suitecrm-analytics.co.uk
SMTP_PASSWORD=password
#SMTP_SECURE_AUTHENTICATION=
#SMTP_SECURE_AUTHENTICATION=SSL
SMTP_SECURE_AUTHENTICATION=TLS
# Email address that SuiteCRM Analytics sends from
SMTP_FROM_EMAIL_ADDRESS=donotreply@suitecrm-analytics.co.uk
SMTP_FROM_EMAIL_NAME=SuiteCRM Analytics
# Email addresses seperated by spaces that error emails are delivered to
SMTP_SEND_ERROR_EMAILS_TO=user@suitecrm-analytics.co.uk
# Set this to 1 or zero. Setting it to 1 means that you will get an email for every sucessful run on the ETL
SMTP_SEND_SUCCESS_EMAILS=1
# Email addresses seperated by spaces that success emails are delivered to
SMTP_SEND_SUCCESS_EMAILS_TO=user@suitecrm-analytics.co.uk user123@suitecrm-analytics.co.uk
# SuiteCRM Source Database Connection Details
SUITECRM_HOST=127.0.0.1
SUITECRM_PORT=3306
SUITECRM_DATABASE=suitecrm_testdata
SUITECRM_USERNAME=suitecrmrootuser
SUITECRM_PASSWORD=suitecrmrootuserpassword
# SuiteCRM Analytis Target Database Connection
SUITECRM_ANALYTICS_HOST=127.0.0.1
SUITECRM_ANALYTICS_PORT=3306
SUITECRM_ANALYTICS_DATABASE=suitecrm_dwh
SUITECRM_ANALYTICS_USERNAME=suitecrmrootuser
SUITECRM_ANALYTICS_PASSWORD=suitecrmrootuserpassword
./setup-suitecrm-data-integration.sh
./run-suitecrm-data-integration.sh
./data-integration-client.sh
SuiteCRM Web Analytics
SuiteCRM Web Analytics is a web based analysis and reporting frontend that allows users to explore data in the Data Warehouse that has been extracted from SuiteCRM and third party data sources. Users are able to log into the web portal to run, filter data or schedule reports. The web portal provides the ability to import new reports and dashboards created using Pentaho powerful CTools and Report Designer. Reports can support a number of different visual charts and output types such as HTML, PDF and Excel.
./setup-suitecrm-analytics.sh
./start-suitecrm-analytics.sh
tail -f tomcat/logs/catalina.out
org.apache.catalina.startup.Catalina.start Server startup in N ms
Once the server has initialised you can log into the SuiteCRM Analytics Web Application by navigating to the hostname or IP address of the server in your web browser. By default the web application is listening on port 8080 so for example, your server may be available on
http://localhost:8080/suitecrmanalytics